Enable Virtual Machine (BIOS) / update windows 1) Important: working for Windows 10 latest version & windows 11… 2) Important: The mothe...
1) Important: working for Windows 10 latest version & windows 11…
2) Important: The motherboard and processor must support virtualization, and the option has to be enabled on the Basic Input/Output System (BIOS) or Unified Extensible Firmware Interface (UEFI).
1) Windows Start – Search for Turn Windows features on or off and click the top result to open the app. (note:- working for Windows 10 latest version & windows 11)
Check the “Virtual Machine Platform & Windows Subsystem for Linux” option
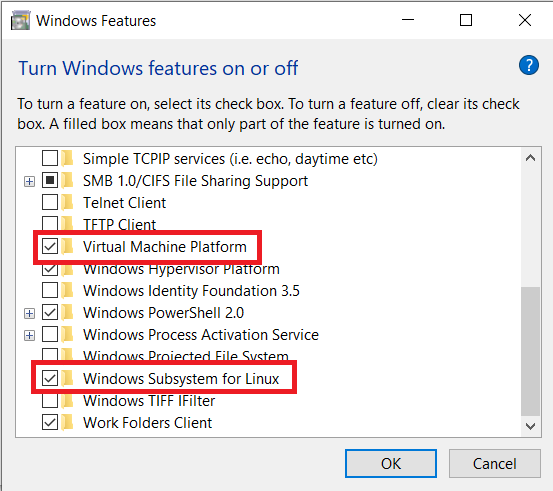
2) Click the ok button & Click the Restart button
3) Download this WSL 2 kernel update (required) Click to download .msi file (for Linux kernel update package, more detials visit MicroSoft website.- If needed) then install wsl_update_x64.msi file and restart computer
4) windows Start Search for PowerShell, right-click the top result, and select the Run as administrator option
5)Type the following command to set Windows Subsystem for Linux 2 your default architecture for new distros that you install, and press Enter
wsl --set-default-version 2

Redy to wsl-2….
Install ubuntu/deepin/….
View Linux distributions (list online) (ubuntu/deepin &....)
wsl -l -o
now install distribution (ubuntu)
wsl --install Ubuntu-20.04
verify the version of the distribution, below command then press Enter
wsl -l -v

Redy to Ubuntu…..


